 The JPEG format is the best choice for optimizing continuous-tone images, such as photographs and images with many colors or gradients. When you optimize a JPEG, you can make the file size smaller by applying compression. The more compression, the smaller the image, but if you compress the image too much, the image can look terrible. The trick is finding the right balance, as you discover in this section.
If you have a digital photograph or another image that you want to prepare for the Web, follow these steps to optimize and save it in Photoshop (in Photoshop Elements or Fireworks, the process is similar although the specific steps may vary):
1. With the image open in Photoshop, choose File > Save for Web & Devices (or File > Save for Web).
The Save for Web & Devices dialog box appears.
2. In the top-left corner of the dialog box, choose either 2-Up or 4-Up to display multiple versions of the same image for easy side-by-side comparison.
In the example shown here, I chose 2-Up, which makes it possible to view the original image on the left and a preview of the same image as it will appear with the specified settings on the right.
The 2-Up option, as the name implies, displays two different versions for comparison, as you can see below.
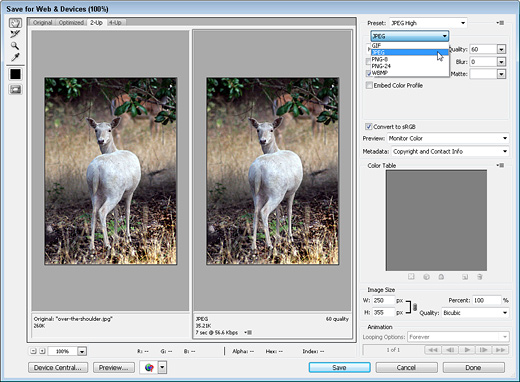
3. On the right side of the window, just under Preset, click the small arrow to open the Optimized File Format drop-down list and choose JPEG.
4. Set the compression quality.
Use the preset options Low, Medium, High, Very High, or Maximum from the drop-down list. Or use the slider just under the Quality field to make more precise adjustments. Lowering the quality reduces the file size and makes the image download more quickly, but if you lower this number too much, the image will look blurry and blotchy.
Photoshop uses a compression scale of 0 to 100 for JPEGs in this dialog window, with 0 the lowest possible quality (the highest amount of compression and the smallest file size) and 100 the highest possible quality (the least amount of compression and the biggest file size). Low, Medium, and High represent compression values of 10, 30, and 60, respectively.
5. Specify other settings as desired (the compression quality and file format are the most important settings).
6. Click Save.
The Save Optimized As dialog box opens.
7. Enter a name for the image and save it into the images folder in your Web site folder.
Photoshop saves the optimized image as a copy of the original and leaves the original open in the main Photoshop work area.
Repeat these steps for each image you want to optimize as a JPEG.
At the bottom of the image preview in the Save For Web and Devices dialog box Photoshop includes an estimate of the amount of time the image will take to download at the specified connection speed. In the example shown in the figure above, the estimate is 7 seconds at 56.6 kbps.
As you adjust the compression settings, the size of the image will change and the download estimate will automatically adjust. You can change the connection speed used to make this calculation by clicking on the small arrow just to the right of the connection speed, and using the drop-down list to select another option, such as 256 kbps for Cable Modem speed. Use this estimate as a guide to help you decide how much you should optimize each image.
Creating and Optimizing images with Adobe Photoshop Save for Web
Alongside Photoshop and Photoshop Extended, Adobe also publishes Photoshop Elements and Photoshop Lightroom, collectively called “The Adobe Photoshop Family”. In 2008, Adobe released Adobe Photoshop Express, a free web-based image editing tool to edit photos directly on blogs and social networking sites; in 2011 a version was released for the Android operating system and the iOS operating system.'”