Reducing an image’s size for use on the Web requires two steps — reducing the image’s physical size by reducing its dimensions, and reducing the resolution of an image, which changes the number of pixels per inch that make up the image. When you’re working with images for the Web, you want to reduce the resolution to 72 pixels per inch (or ppi) because that’s all that can be displayed on most computer monitors.

When you resize an image in Photoshop in the Pixel Dimensions area, you can specify the new size in pixels or as a percentage of the original size.
Changing the physical dimensions of an image is important for two reasons: The images must be small enough to display well on a computer monitor, and you want them to download quickly to a user’s computer. The smaller the image is, the faster it will download.
Although you can change the display size of an image in a Web page by altering the height and width settings in Dreamweaver, you get better results if you change the physical size of the image in an editor such as Photoshop.
Follow these steps to change the physical size of an image in Photoshop (in Photoshop Elements or Fireworks, you follow a similar process although the specific steps may vary):
1. With an image open in Photoshop, choose Image > Resize.
The Image Size dialog box opens.
If you don’t want your original image to lose quality (or you just want to play it safe), make a copy of your image and resize the copy for your Web site.
2. To change the resolution of your image, first deselect the Resample Image check box at the bottom of the Image Size dialog box.
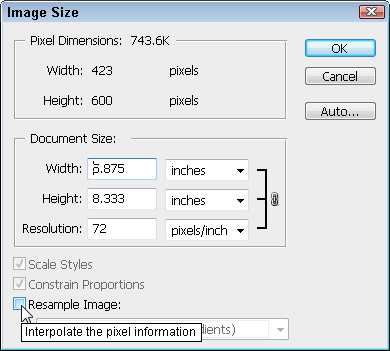
For best results, you always want the Resample Image check box deselected when you change the resolution.
3. Click and drag to highlight the number in the Resolution field and replace it by typing in the number 72.
4. Click to select the Resample Image check box.
With the Resample Image check box deselected, you can’t change the Pixel dimensions so it must be checked when you change the image size.
5. Enter a height and width for the image in the Height and Width fields.
I reduced the size of this image to 200 pixels wide. If the Constrain Proportions check box at the bottom of the dialog box is checked (as it is in this example), any changes you make to the height automatically affect the width (and vice versa) to ensure that the image proportions remain constant. I prefer to work this way, but if you do want to change the image and not maintain the proportions, you can deselect this box.
6. Click OK to resize the image.
If you want to return the image to its previous size, choose Edit > Undo. Beware, when you save the image, the changes become permanent.
Why only 72 ppi?
When you save images for the Web, you save them at a resolution of 72 pixels per inch (better known as ppi). Most computer monitors display no more than 72 ppi, so any resolution higher than that is wasted on the Web because you’d be making your visitors download more pixels than they can see. However, if you want to print an image, you want all the pixels you can get, usually at least 200 ppi or higher, which is why most images you see on the Web look terrible if you try to print them in a large size.
Creating and Optimizing images with Adobe Photoshop Save for Web