There is no Insert Video button in Dreamweaver, but you can add MP4s, QuickTime, and videos in almost any other type of format, if you know where to look in the Dreamweaver Insert Menu. (Read this tutorial if you’re inserting a video in Adobe Flash Video format, which uses the .flv extension)
In this tutorial you learn to insert a QuickTime video in Dreamweaver and customize the settings for a QuickTime video, but these instructions apply to inserting any video format (other than Flash video).
If you want to insert Windows Media video (which uses the .wmv extension), an MP4, or any other video format into Dreamweaver, the steps are the same, but when you get to the section on setting parameters in this tutorial, you’ll need to adjust for the parameters specific to your video format (you can usually find these by doing a Google search for the video format name + parameters).
TIP: Although you can host your own video files on your web server (or hosting service) an increasingly popular option is to host videos on an online service such as YouTube or Vimeo. To learn more about why Vimeo and YouTube offer the best video hosting options and how to embed video into Dreamweaver from these sites, read this tutorial.
1. Begin by editing and exporting your video into a web-friendly format
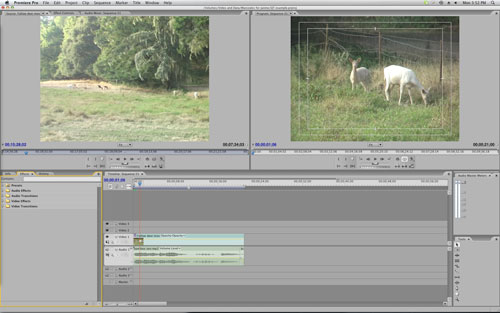
Although you can insert many different types of video into your pages in Dreamweaver, you’ll first need to edit and convert the video in a video editor, such as Adobe Premiere Pro (shown here). Without getting too technical, many video cameras capture video in an uncompressed format. While this is best for editing, the file sizes can be absolutely enormous. If you are technically sophisticated, and you want to learn more about video compression and standards, Apple has a pretty good explanation. Most video-hosting sites will not accept uncompressed video (even if you could stand having your computer tied up for three days or so, uploading a 10-minute clip), so you will need to export your files into something more manageable.
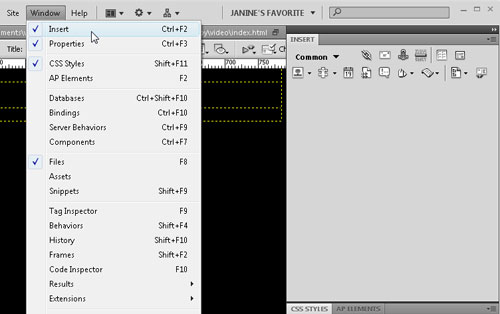
2. You’ll find many options in the insert panel in Dreamweaver
Dreamweaver’s Insert panel (Window>Insert) provides a handy collection of options, including the Insert>Media>Plugin feature you’ll need for adding video in QuickTime, Windows Media, or any format other than Flash. If you’re using Dreamweaver CS4 or later, you have the option to keep the Insert panel at the top of the workspace using the CS3 workspace layout (Window>Workspace Layout>Classic) or integrate it into the panels, as we’ve done here. (Note: In Dreamweaver CS3, this feature is called the Insert Bar and it’s only available at the top of the workspace.)
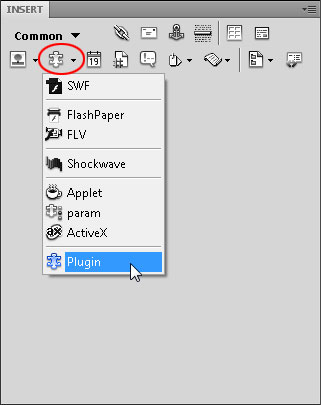
3. Decide where you want to place your video or audio file
First, place your cursor where you want to add the video in your webpage. Then, with the Insert panel open and the drop-down menu at the top set to Common, click the arrow to open the drop-down menu next to the Media icon and select Plugin (note that the Media icon changes to reflect whatever you last selected). Alternatively, you can choose Insert>Media>Plugin.
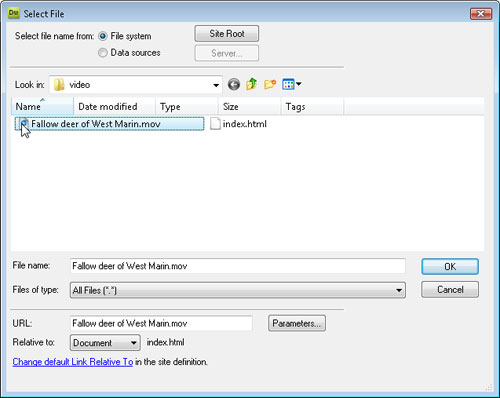
4. Select the file you want to insert into the page
To insert a video or audio file in the page, select the file, as you would if you were inserting an image into the page. You can also Control-click [PC: Right-click] on the Plugin icon and select Source File). If you’ve used the Insert Flash Video (.flv) options in Dreamweaver, you may be surprised that when you add files in other formats using the Plugin option, there is no dialog in Dreamweaver to control the settings for size or other options. Don’t worry; just insert the file and you’ll get a chance to set the size and other settings in the following steps.
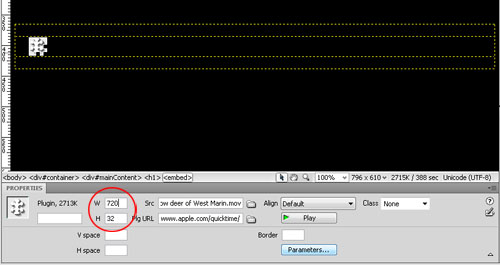
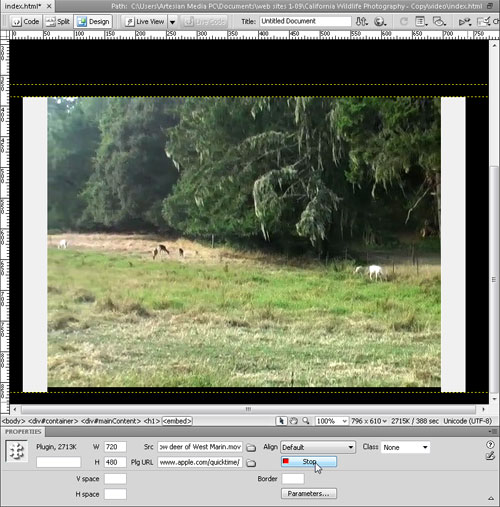
5. Use the Property Inspector to enter the size
Because Dreamweaver can’t automatically detect the size of a QuickTime file, you’ll need to specify the size after you insert it into the page. To do so, click to select the 32×32 icon that Dreamweaver inserts in place of the video and then enter the actual size of the video in pixels in the W (width) and H (height) fields in the Property inspector. The video file we’re using in this lesson is 720×480 pixels (this is the standard size for non-HD video). Once you input the sizes, the icon will expand to the specified size.
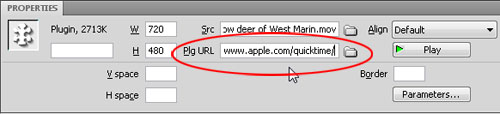
6. Optional: Include the URL of any necessary plugins
With the video selected, you can also use the Property inspector to add a Plugin Page URL. The Web address you enter in the Plg URL field will be displayed in place of the video if the visitor to your site doesn’t have the QuickTime player installed on his or her system. If you’re using a QuickTime video, the Plugin URL is http://www.apple.com/quicktime.
7. Use CSS to position or align video and other files
Although you can use the Align drop-down menu in the Property inspector to align your video, the better option is to use Cascading Style Sheets (CSS). In this example, we’ve created class styles named .float-right and .float-left using the Float options in the Box category of the CSS Rule Definition dialog. To create a new class style, click on the New CSS Rule icon in the CSS Styles panel, choose Class in the drop-down menu, name your style, and click OK to enter the CSS Rule Definition dialog. (You’ll find lots more information about creating and using class styles in our Dreamweaver tutorials section.)

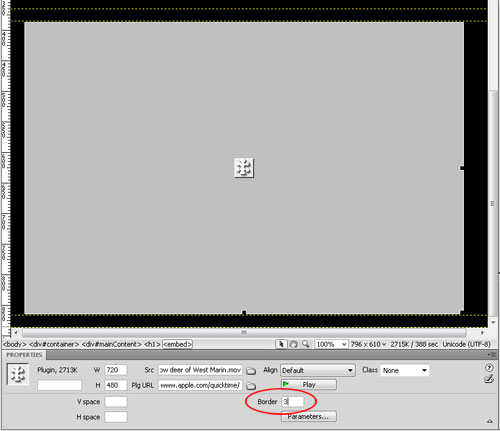
8. In the Properties Inspector, you can add a border as well as vertical or horizontal (h or v) space around the file
To add a border to your video, enter the size you want in pixels in the Border field in the Property inspector. You can also add V Space and H Space (vertical and horizontal space, respectively). When you use H space and V space, you add margins to the top and bottom or left and right. If you define a style in CSS to specify margins and border, you’ll have more options and can choose to add margin space to any or all of the sides of the video, as well as change the color and style of the border.
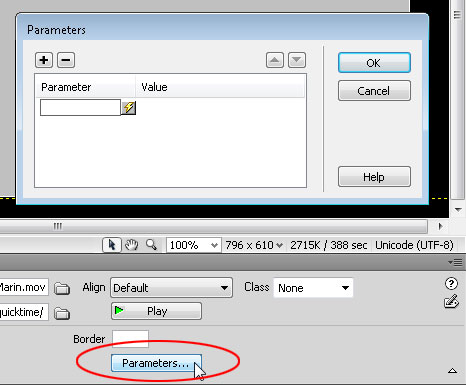
9. You can set more advanced options using Parameters
For more advanced options and settings, you’ll use the Parameters option in Dreamweaver and you’ll need to know the parameter options specific to QuickTime (or whatever video format you’re using). To open the Parameters dialog, click on the Parameters button in the Property inspector (remember, the video must be selected for these options to display in the Property inspector).
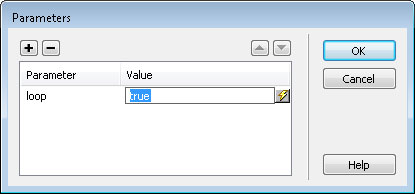
10. Use Parameter options to set a video file to loop (repeat)
If you want your video to play in a continuous loop, use the Parameters dialog, enter “loop” as the Parameter and “true” as the Value, and click OK. Most parameters work this way, with “true” being the setting to turn an option on, and “false” the setting to turn an option off. Thus, if you set the Parameter to “loop” and the Value to “false,” the video won’t loop.
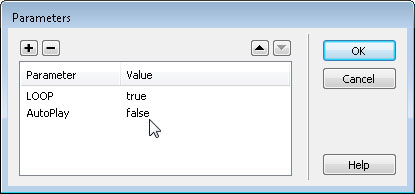
11. Let your visitors have control: turn off “auto play” on videos
To add additional parameters, click the plus (+) sign at the top of the Parameters dialog and then enter each parameter and value on its own line. Another popular QuickTime parameter is Autoplay. To prevent the video from playing when the page loads, enter the Parameter “autoplay” by setting the Value to “false.”
12. Set the Controller parameters for your video
Another popular option is to include the video controller using the Parameter “controller” and Value “true.” To hide the controller, set the Value to “false.” And here’s an advanced tip: For the controller to display properly, you need to add 16 pixels to the Height of the video in the Property inspector. So the new Height in this example would be 496 pixels.
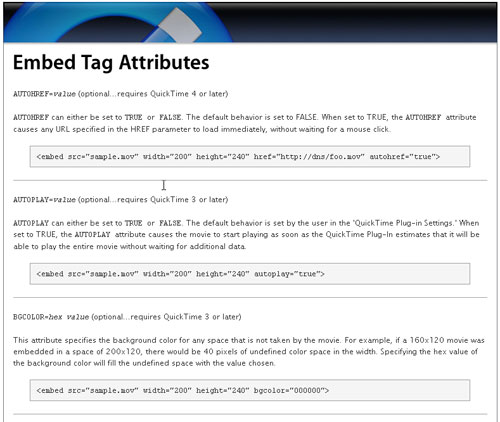
13. Parameters Review
controller = true or false (on or off)
controls = to specify which sound control to display
href = URL to your file http://www.yourdomain/your-video.mov
autoplay or autostart = true or false (yes or no)
bgcolor = any hexidecimal color, such as white: #ffffff
width = measured in pixels
height = measured in pixels
plugin URL = address of any required plugin
loop = true or fales (repeat or not)
14. Use the Play button in Dreamweaver or any Web browser to preview
Dreamweaver CS4 and later added a feature that makes it possible to preview the video in the Dreamweaver workspace. Just select the video and press the Play button in the Property inspector and the video should play much as it would in a web browser with the QuickTime plug-in. You can also preview your work by using the Browser preview option (File>Preview in Browser). (Note: You must have the QuickTime plug-in installed on your computer for the QuickTime video to play in a web browser.)
I have Dreamweaver CS6 Student edition and am following a DW CS6 tutorial where a video is inserted into my page. When the video plugin icon is selected the tutor has a play button in the properties panel, but there is no option to play in my DW, only a blank space where the instructor’s play button is. Can anyone provide a solution for this? Thanks.
Not sure why your Play button is not visible, but remember, you can always preview the page in a Web browser to test the video. And here’s a tip – use the F12 key as a shortcut to launch a web browser from within Dreamweaver to preview any page you have open.
Hi! and thanks for your help! I just add a video to a site, but I don´t want the screen to stay black. Is there any way I can set the video to the first image ou use a png file to display on the black screen?
You can use parameters or Javascript to include an image before the video starts playing, but my best advice is to use a service like Vimeo.com, which not only makes it easy to add an image, it ensures that the right format is delivered to each visitor to your site based on the device, operating system, and browser they are using.
This is fantastic! Great Job!
Hello… Please, i’ll like a complete ebook of adobedreamweaver cs6 to be sent to my mail address… “Energieman86@gmail.com” thank you so much in advance!
Hi there ! Just a very simple question 😉
Is it possible to “automatically” open a new page, which has a specific url of course, once (and only after) that the video (mp4) in the present page has reached its end ?
Thanks for your help !
Great tutorial, is there away of disabling right click and the little down arrow on the control bar so that users can’t save the source file as our videos are in a member’s area of a subscription service so have some financial value? – Thanks
Hi Janine,
Great explanation. My problem is that the video plays differently on different computers. Some are full screen and some still show the controls even through I have specified that they don’t. Any ideas on what I am doing wrong?
Hi, Thanks, great job.
I would like to put together two movies.
#1 should autostart when entering site
#2 should autostart when #1 ends (no gap), and continue in a loop
(or preferably only use one movie, and loop the last 50 frames)
How would this code look like?
Big thanks in advance.
/p
Thank you @
I believe you might be able to do that with Javascript or some other programming language, but why don’t you just edit the two videos together into one video file? Seems like that would be the simplest solution.
Getting video to play consistently across different computers, devices, and operating systems is a big challenge for everyone. You’re doing nothing wrong, but the solution many of us use is to upload our videos to YouTube or to a site like Vimeom which has more privacy controls, and then copy the code from the video site into our web pages to display the video. The advantage? YouTube, Vimeo, and other good video hosting sites will turn your video into multiple versions in different formats and deliver the best one to each user, which will ensure much more consistent, or at least functional, play for all of your visitors. Even big companies use dedicated video hosts these days because video is so complicated to manage on the web.
hi,
I actually did embed a vimeo video to my website page correctly however nothing shows ups on the video screen except a large blue box and small icon. What can I possibly be doing wrong?
Hello, I was wondering if it is possible to link a video to an image and upon click have that video open in a separate tab and fit screen. That sounds like a mouthful, but here is my dilemma. I have my video open in a new tab except the dimensions are off and it is big. Is it possible to add in some code or something which makes the video fit the size of the new tab? Thank you
My website is showing up with a gray screen and a puzzle piece on it. I have no idea where to from here. Please help?
Hi
I insert a MP3 audio onto Dreamweaver CS6 and it works OK on Chrome from my Windows 8 laptop. But I don’t see it with my Iphone and Ipad.
Is there a way MP3 can be played both on Windows PC and Iphone and IPad ?
Thank you so much for your help.
I read your book and learned a lot from it
I am using Dreamweaver CS6 and have embedded several audio files to launch on my website. I have the parameters set to false for loop as well as autoplay. When the page from the website launches all the audios begin to play at the same time. Is there something else that I need to do? Thank you.
This is in addition to the previous comment, when I launch my site in IExplorer the audios work as I want them to, and that is to have the visitor to click on play to hear the audios, but in Chrome they all play simultaneously.
I have MacroMidea Dreamweaver MX ……………
i get the error message
unable to find plugin that handles this media type – yes my video is .mov
Hello Janine,
First of al thanks for the detailed explanation on this site. I followed your steps using CS6 to view an mp4 file. It all works in preview (F12) mode locally (explorer/chrome/safari). But when uploading to the net i receive a message “an error occurred inside a plugin contained on this page” resulting the video wont play. I wonder where my error is located.
Thanks to take a look,
Best Regards,
Brian
please can you tell me how to input a slider plugin into dreamweaver
HI,
I tried to insert a plugin in dream weaver CS5. when I open the browser I could only hear the voice of the video but unable to see it. will you help me to fix this…
Thanks for the help. It worked !! 🙂 I was struggling on my own for long time.
Glad to be of assistance.
Please, how can I create traffic on my website?
Hi, I’m using cs4 and I inserted a video and comand autostart:false but the video is not playing when I click play on the web. Thanks
[…] How to insert an MP3, MP4, WMV, or Quicktime Video in. – Aug 17, 2012. There is no Insert Video button in Dreamweaver, but you can add MP4s, QuickTime, and videos in almost any other type of format, if you know where to look in the Dreamweaver Insert Menu. (Read this tutorial if you're inserting a video in Adobe Flash Video format, which uses the.flv extension). […]