 When you create a new style in Dreamweaver using CSS features, you will need to choose which type of style you want to create and which ‘selector’ you want to use.
Understanding (and remembering) the differences between the various types of style selectors can be a challenge. That’s why I created this short tutorial on the differences between CSS selectors. Bookmark this page as a handy reference and consider it a crash course in choosing the best selector type for your styles.
To make matters even more confusing, Adobe changed the selector names in Dreamweaver CS4. If you’re using version CS4, CS5, CS6, or a later version, this tutorial is for you.
What are CSS selectors good for anyway?
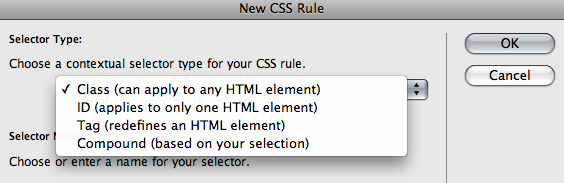
Each of the selector options has different naming restrictions and purposes. If you’re completely new to working with styles, this may not make much sense yet, but I encourage you to read through all these descriptions of selectors so that you can appreciate your options before you move on.
TIP: Don’t feel you have to memorize all this. Instead, consider bookmarking or printing this page so you can refer to this list of selectors as you create your styles.
The following sections offer a description of each of the four selector options available from the New CSS Rule dialog box when you create new styles in Dreamweaver CS4 or later.
The four selector types
Class selectors
The class selector is the most versatile selector option. Class styles can be used to format any element (from text to images to multimedia), and they can be used as many times as you like on any page in a Web site.
Class style names always begin with a period, and you can create class styles with any name as long as you don’t use spaces or special characters (hyphens and underscores are okay). Thus you could create a style called caption for the text that appears before your pictures, and you could create a style called photo-credit to format the name of a photographer differently from the caption. In that case, your class styles would look like this:
.caption .photo-credit
Dreamweaver helps you with the period (or dot). If you choose Class as the selector type and forget to include a dot at the beginning of the name, Dreamweaver adds one for you. (Note: don’t include any space between the dot and the style name.)
One other thing that can make styles confusing is that when you apply a Class style to text or another element, the dot doesn’t appear in the name when it’s added to your HTML code. Thus, if you applied the .caption style to a paragraph tag to format the text under an image, it would look like this:
<p>This is a photo of an Egret in flight.</p>
Class styles must be applied to an element, such as the Paragraph tag shown in this example. Class tags can even be added to elements that are already defined by other styles.
When you create a Class style in Dreamweaver, the style is displayed in the CSS Styles panel, and added to the CSS drop-down list in the Property inspector.
You can apply class styles using the CSS drop-down list, shown in this figure. It’s common to create styles to align images and other elements to the right or left of a page, and styles with the names .float-right and .float-left are included in most of the predesigned CSS layouts in Dreamweaver. These styles commonly include margin spacing to create a little white space between an image and text when text is wrapped around the aligned image, shown in this figure.
For more details about creating and applying styles with class selectors, see this article about some of the differences in class selectors.

Class Selector Styles: Styles created with class selectors are available from the Property inspector and can be applied to any element and used as many times as you like on any page.
ID selectors
Think of ID styles as the building blocks of most CSS layouts. ID styles must begin with a pound (#) sign, and, similar to class styles, Dreamweaver adds a pound (#) sign to the beginning of the style name automatically if you forget to include it. (Note: Don’t include any space between the # and the style name.)
The ID selector option was a new addition to the CSS Rule dialog box in Dreamweaver CS4 (in CS3, you had to choose the Advanced option to create an ID style). Similar to class styles, you can name ID styles anything you like, as long as you don’t use spaces or special characters (again hyphens and underscores are okay). Thus an ID style used to identify the sidebar section of a page could look like this:
#sidebar
Similar to class styles, the # sign is not used in the HTML code when a style is applied to an element, such as a <div> tag like this:
<div id=”sidebar”>Between these tags with the sidebar ID style, you would include any headlines, text, or other elements in your sidebar.</div>
What’s special about ID styles is that they should be used only once per page. This makes them ideally suited to formatting <div> tags and other block-level elements that are used to create distinct sections in a page. Thus, ID styles are great for creating page layouts where you want to define each section of a page only once.
In the predesigned CSS layouts included in Dreamweaver, all the designs are created by combining a series of <div> tags with ID styles using names like #container, #header, and #footer to identify the main sections of the design. In this figure, you can see how a collection of ID and Class styles are displayed in the CSS Styles panel after they’re created. ID styles are also added to the ID drop-down list in the Property inspector, making them easy to apply to a selected element.
ID Selectors: Styles created with the ID selector should be used only once per page; they are ideal for creating a CSS layout.
Tag selectors
The tag selector is used to redefine existing HTML tags. Select this option if you want to change the formatting options for an HTML tag, such as the <h1> (heading 1) tag or the <ul> (unordered list) tag.
In many cases, redefining existing HTML tags with CSS has advantages over creating new styles. For example, content formatted with the Heading 1 tag is well recognized on the Web as the most important text on a page. For that reason, many search engines give priority to text formatted with the Heading 1 tag. Similarly, the hierarchical structure of the <h1> to <h6> tags helps ensure that even if a visitor to your site changes the text size in his or her Web browser, text formatted with the Heading 1 tag is still larger relative to text formatted with an Heading 2 tag, which is larger than text formatted with the Heading 3 tag, and so on.
The ability to change the appearance of headings and other tags with CSS makes it possible to retain these advantages while still being able to use the font, size, color, spacing, and other formatting options that you prefer in your Web design. When you use the tag selector, the style definition is applied automatically to any text or other element that’s been formatted with the corresponding tag. Thus, if you’ve formatted a headline with the <h1> tag and then create a new <h1> style, the formatting you used to define the style will apply automatically to the headline as soon as the style is created.
For details on working with tag selectors, see this article about editing CSS styles.
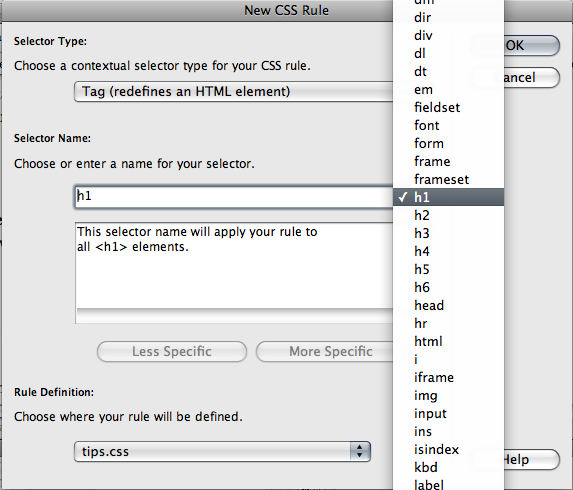
Tag Selectors: You can redefine the appearance of any HTML tag by creating a style with a tag selector.
Creating compound styles
The compound selector can be used to combine two or more style rules to create a style definition that displays only when one style is contained within another. Compound styles are useful when you want to do something like use the Heading 1 tag multiple times to format headlines in different ways on the same web page. For example, you could create one style for headlines that appear in the main story area of a page and then create another style for headlines that appear in the sidebar on the page and still use the Heading 1 tag to format both.
Compound styles are created by combining ID, class, or tag styles and look like this:
#sidebar h1
The compound style selector makes it possible to combine styles to create new style definitions that apply only to an area of a page already defined by an existing style.
If a compound style combines more than one tag, it’s written like this:
#sidebar h1 a:link
Again, you must include a space between each name or tag. In this example, you see a style that defines the appearance of the active link tag only when the link is located inside an element formatted with the <h1> tag that’s also inside an element formatted with the #sidebar ID. A compound style like this makes it possible to create links that look different when they appear in a headline in the sidebar of a page than when they appear in another part of the sidebar.
After you figure out the differences among these style selector options and when they’re best used, you’re well on your way to mastering the art of creating Web pages with CSS in Dreamweaver.
THANK YOU I’m learning web design from a man who’s native language is Chinese, so his broken English makes it very difficult for me to understand a single word he says…I tell people it’s like learning a double foreign language.
Very Nice tutorial. Can you please explain the CSS style definition panel in Dreamweaver CS6? It will help us lot.
You’ll find a detailed review of the CSS rule definition dialog in Dreamweaver CS6 and Dreamweaver CS5 in this article http://www.digitalfamily.com/tutorials/how-to-use-the-css-rule-definition-panel-for-styles-in-dreamweaver-cs6/
Hi Janine,
Thanks for sharing the links. This is very helpful.
Mejor redactado imposible. Muchas gracias. Besos!!
Thanks a lot for this article. i was too confused in deciding which CSS Selector to use.
Thanks a lot again for providing such a wonderful tutorial for people like us 🙂
So happy to know you found this useful.
CSS
Hello. Useful article. I’m a newbie in CSS coding. I’ve got a web page to do a little design corrections. But I don’t know what all different selectors mean or do.
So far I have managed to decode some CSS selectors (correct me if I’m wrong):
div#sporociloTargets just one
divon a page with IDsporocilo.div.sporociloTargets any
divwith a class ofsporocilo.#pageDoes this targets any element with ID
page?div.generalbox, div.sectionThese targets a
divwith classgeneralboxorsection..category .course_infoWhat does this do?
table.categorylist tdThis one targets
tdonly insidetablewith class ofcategorylist..generalbox h2, #page h2.main,These are grouped together. First targets any
h2with classgeneralbox? Second targetsh2with classmainin what/where?What is the difference between
h2.mainand.main h2?#dock div.controlsWhat does this do?
div.sporocilo.boxWhat does this do?
I hope you can help me.
Best regards,
Bostjan
have you updated this for creative cloud? Maybe it’s relative anyway and works. I don’t know Nice needed info though, thanks much
I actually was initially searching for strategies for my personal
blog and came across your own article, “Choosing the Best CSS Selector: Class, ID, Tag,
or Compound | Web Design Training courses, videos & tutorials
at DigitalFamily.comWeb Design Training courses, videos & tutorials at DigitalFamily.
com”, do you really care in cases where I actually start using a number of of your points?
With thanks ,Jayden
[…] Old version, but excellent reading […]
Thanks for the compliments. And yes, we do need to update this for the most recent version of Dreamweaver.