Web Design Training courses, videos & tutorials at DigitalFamily.com
Web design & Internet trends
books, videos, training & consulting
  • Home
  • Store
    • Web Design Books
    • Dreamweaver Videos
    • Expression Web Videos
    • Products
    • Shopping Cart
    • Order Status
  • Consulting Services
  • Web Tutorials
    • Web Design 101
    • Mobile and Responsive Web Design
    • Social Media
    • Online Reputation
    • Dreamweaver
    • Expression Web
    • Cascading Style Sheets
    • WordPress
  • Dreamweaver
    • CS6 Tutorials
    • CS5 Tutorials
    • CS4 Tutorials
    • CS3 Tutorials
  • FAQ
    • Dreamweaver
    • CSS
    • Graphics
    • WordPress
    • Ask the Author
  • About Us
    • About DigitalFamily.com
    • About Janine Warner
  • Contact
Search the site...
Home» Tutorials » Expression Web » Create a Centered Layout using Div Tags and CSS Layout in Expression Web

Create a Centered Layout using Div Tags and CSS Layout in Expression Web

Posted by Janine Warner - September 8, 2012 - Expression Web, Tutorials
0

CSS is the best way to create page designs these days, but if you want your designs centered when displayed in a browser, you’ll need to know this little trick.

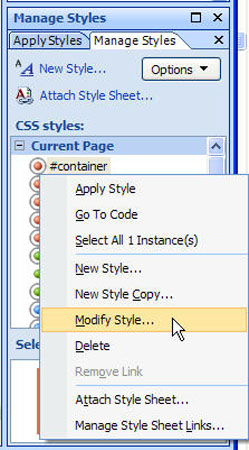
1. First, you have to specify a width of the div tag you want to center, and it has to be smaller than the display area, otherwise the divs will extend all the way across the page. To do so, select the outer most div in your design. In this example, I’ve named that div #container. Right-click on the name of the div and choose Modify Style (if you haven’t yet applied any style to a div, choose New Style).

Figure EW Tutorial 4-1.jpg


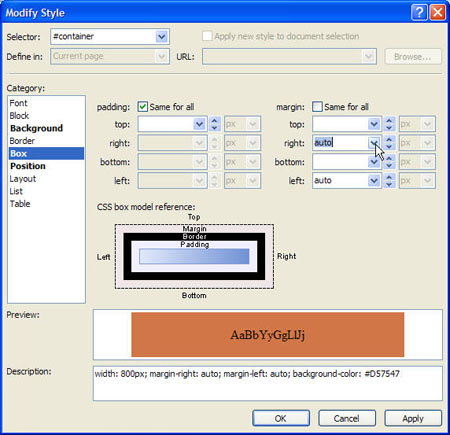
2. In the Modify Style or New Style dialog, select the Position category, and enter a width. In this example, I set the width to 800 pixels.

Figure EW Tutorial 4-2.jpg


3. Now the tricky part. To center a div on the page, you need to set the margins left and right to auto. The effect of this is that the browser will automatically set an equal amount of space on each side of the div, effectively placing it in the center of the page. To do this, choose the Box category in the Modify Style or New Style dialog and set the left and right margins to auto.

Figure EW Tutorial 4-3.jpg


4. When you save the new style (and it is applied to the div) the page will automatically be centered, like the design shown here in Internet Explorer.

Figure EW Tutorial 4-4.jpg

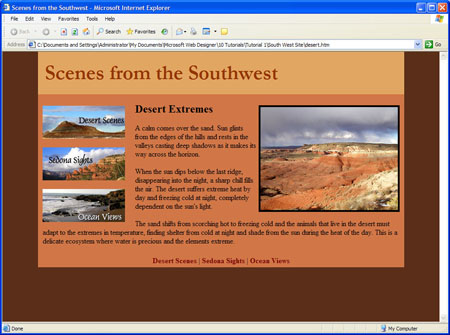
Centering your page designs helps create the appearance that your designs fill the screen no matter what size the browser window is or what size monitor your visitor uses.

expression-web

Leave a Reply Cancel reply

Your email address will not be published. Required fields are marked *

You may use these HTML tags and attributes: <a href="" title=""> <abbr title=""> <acronym title=""> <b> <blockquote cite=""> <cite> <code> <del datetime=""> <em> <i> <q cite=""> <strike> <strong>

Share with your friends

Expression Web Tutorials

  • How to Add a Favicon Image to Your Web Site
  • Test Your CSS Before You Publish with Expression Web
  • How to Test Web Site Accessibility with Microsoft Expression Web
  • Make Global Updates with Dynamic Web Templates in Expression Web
  • Create a Rollover with the Swap Image Behavior

Expression Web Products

  • Microsoft Expression Web Essentials Training Video for versions 2 & 3

    expressionweb2_ess-lg
    Training Video
    Janine's best-selling Expression Web training video starts with the basics and takes you through more advanced features, including in CSS, templates, and more. You'll get a solid introduction to web design, as you learn Microsoft Expression Web, and you're sure to love Janine's patient (and fun!) teaching style. This video works for both Expression We 2 and 3. More Info »
    $49.99$25.00

    View Cart / Checkout
© 2001 - 2013 All rights reserved. DigitalFamiliy.com was created by Janine Warner | Terms & Conditions of Use | Privacy Policy
  • Home
  • Store
  • Consulting Services
  • Web Tutorials
  • Dreamweaver
  • FAQ
  • About Us
  • Contact